Geometry > Investigating Midpoints
Convex Quadrilaterals | Concave Quadrilaterals - Complex Quadrilaterals
Investigating Midpoints
Press Apps key and select Geometry. Press the soft key Reset. Press Geometry again or soft key Start to begin.
The app comes up in the Plot view, the Geometry app’s drawing view. Use Cmds > 1 Zoom > 1 In.
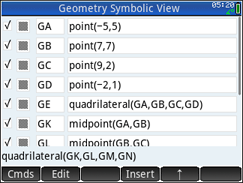
Press the Symb key to switch to the Symbolic View. The Geometry Symbolic View allows editable definitions of objects drawn in the Geometry Plot View. Select Cmds > 1 Point > 1 Point. Key in -5,5 and press soft key OK or the Enter key. Key in the next three points using the values shown in the Geometry Symbolic View screen.
For the quadrilateral definition use Cmds > 3 Polygon > 4 Quadrilateral. Use the soft key Vars to enter GA, GB, GC, and GD. Separate the points in the quadrilateral definition by using a comma.
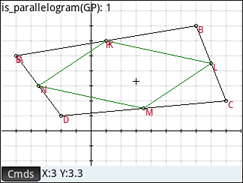
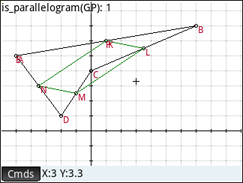
We next show that connecting the midpoints of a convex quadrilateral forms a parallelogram.
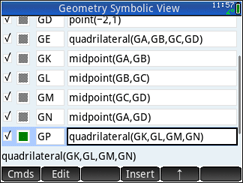
Begin by selecting Cmds > 1 Point > 3 Midpoint. Use the soft key Vars to enter GA and GB. Separate the points in the midpoint definition by using a comma. Key in the next three remaining midpoints definitions using the values shown in the second Geometry Symbolic View screen.
For the midpoint's quadrilateral definition use Cmds > 3 Polygon > 4 Quadrilateral. Use the soft key Vars to enter the the midpoint vars provided by the Geometry Symbolic View. Separate the points in the quadrilateral definition by using a comma.
Remark: We experimented with using Plot view to add the original quadrilateral and midpoint definitions. We found it easier to add midpoints GK, GL, GM, and GN plus quadrilateral GP from the Geometry Symbolic View. Next, for a cleaner representation, we edited the GA, GB, GC, and GD definitions created by Plot View to be integer values. We then deleted several Plot View created point definitions that were no longer being used. This is reason why our midpoint definitions and its quadrilateral definition use higher letters. Do not worry about using these higher letters. Just use the midpoint and quadrilateral definitions letters provided by the Geometry Symbolic View.
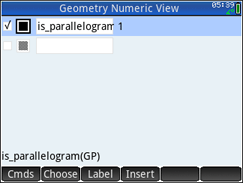
Press the Num key to switch to the Geometry Numeric View. Select Cmds > 3 Tests > 8 Parallelogram. Use the soft key Vars to select the midpoint quadrilateral. Check the definition's display box so that it will show on the Geometry Plot View screen. The number 1 signifies that the quadrilateral is only a parallelogram.
Press the Plot key to see the results.
Concave Quadrilateral - Complex Quadrilateral
Concave Quadrilateral
Clear the Plot View variables by pressing the Clear key. To the “Clear all variables?” dialog box press the soft key OK or Enter key. Use Cmds > 1 Zoom > 1 In.
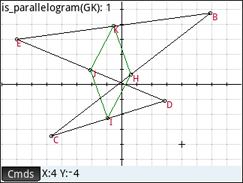
See the first illustration on the right of a concave quadrilateral. Select Cmds > 4 Polygon > 4 Quadrilateral. We are prompted to select a point. Move to a location in Quadrant II and press Enter. To the select another point prompt move to a point in Quadrant I. At this point we will see a line segment from our first point. Press Enter. To the select another point prompt move to point (0,4) or near it . We now see a triangle. Press Enter. To the select another point prompt move back to a point in Quadrant II below and to the right of our earlier point in this quadrant.. At this point we will see a concave quadrilateral. Press Enter. Labels are added to the vertices of our quadrilateral.
Press the Symb key to switch to the Symbolic View. selecting Cmds > 1 Point > 3 Midpoint. Use the soft key Vars to enter GA and GB. Separate the points in the midpoint definition by using a comma. Key in the three remaining midpoints definitions using the same definitions as shown in the above convex quadrilateral example.
For the midpoint's quadrilateral definition use Cmds > 3 Polygon > 4 Quadrilateral. Use the soft key Vars to enter the the midpoint vars provided by the Geometry Symbolic View. Separate the points in the quadrilateral definition by using a comma.
Remark:The above convex quadrilateral definitions were used to draw the concave quadrilateral. Thus the representation of midpoints by letters K, L, M, and N and parallelogram(GP): 1 description. When creating the midpoint and quadrilateral definitions, use the default letters provided by the Geometry Symbolic View.
Press the Num key to switch to the Geometry Numeric View. Select Cmds > 3 Tests > 8 Parallelogram. Use the soft key Vars to select the midpoint quadrilateral. Check the definition's display box so that it will show on the Geometry Plot View screen. The number 1 signifies that it is only a parallelogram.
Press the Plot key to see the results.
Complex Quadrilateral
Use Clear to clear out previous work..To the “Clear all variables?” dialog box press the soft key OK or Enter key. Use Cmds > 1 Zoom > 1 In.
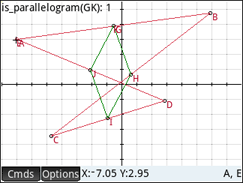
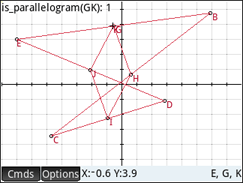
Repeat the above process with the order of point selection being Quadrant II, Quadrant I, Quadrant III, and Quadrant IV.
Remark: Turning on and off labels make the drawing easier to read; The second drawing has the label for vertex A and midpoint G hidden.
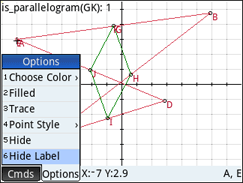
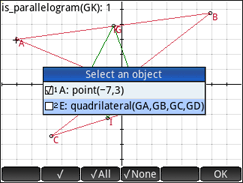
The next three illustrations show the Plot View point A screens to hide the point A label. The first shows us selecting point A. The second shows the Plot View’ Options menu when the point A is selected. The third shows the Select an object dialog window that appears when Options > 6 Hide Label is executed.
The fourth screens shows us moving to midpoint G.
To accomplish the hiding of label for vertex A. We select point A, screen 3.. The screen in the lower right hand corner shows A,E (point A and quadrilateral E). The soft key Options will also be showing. Next, select Options > 6 Hide Labels, screen 4. The Select an object dialog window opens, screen 5. Check A: point(-7,3). Notice, that the updated drawing in the background displays the point A that will now be hidden, not the quadrilateral E that will be displayed. Press the soft key OK or Enter key.
Move to point G, screen 7, The screen in the lower right hand corner shows E,G,K (quadrilateral E, point G, and quadrilateral K). The soft key Options will also be showing.
Follow these directions to hide the G labeled midpoint. Ther are no screens. Select Options > 6 Hide Labels. To the Select an object dialog window, check the G: midpoint(GA,GB). Press the soft key OK or Enter key.
Prime Academy | Learning Center
giving every student every chance to learn and understand
© 2018 -2022 Computer Learning Service. All Rights Reserved.
