HP Prime Getting Started - Generalities > Settings > Examples > Arithmetic Fundamentals
Click on the embedded link to go to the Info menu page or click on the direct link to go directly to the youtube site to play a video on getting started with HP Prime HOME and CAS Eamples, HP Prime CAS Examples, or Algebra Pages and Other Prime Academy Resources.
Embedded YouTube video file or direct link
HP Prime HOME and CAS Examples or direct link
HP Prime CAS Examples or direct link
Algebra Pages and Other Prime Academy Resources or direct link
HOME and CAS Examples | CAS Example
HP Prime Getting Started - Examples
Getting started consist of thee topics: Generalities, Settings, and Examples. When you have finished with the Generalities and Settings, read this Examples section.
A fourth option, Arithmetic Fundamental, is a new option added for 2022. It relies on a holistic approach. Use the Arithmetic Fundamental link above to read about its approach and relationship to our new printed paperback HP Prime Guide THE SILVER-BURDETT ARITHMETICS (Annotated) Selected Exercises and accompanying Basic Math OneNote notebook.
To navigate the Getting Started topics, you can use the top HP Prime Getting Started links at the top of the page or the drop down HP Prime menu. The Getting Started pages also have links to subtopics listed on the page. Use these links to go quickly to the subtopic area.
Note: When referring to figure or a section of a four screen calculator collage, we will provide a link to the figure or section. If the figure or screen collage is on a different page or not showing in the current view, click on the figure's link or section of the screen collage's link to view it. Press the browser back button to return to the instructions you were reading. It may be necessary to scroll slightly in order to see the browser's back button
We will use Prealgebra for our HP Prime calculator examples. The same four screen collage approach used in Generalities and Settings sections will be used here. The four screen collage allows us to have multiple problems shown in a small area using Textbook display.
Place Value and Expanded Notation
Press the On key to startup our HP Prime calculator. If in CAS view, press the HOME key to change to HOME view. Use the Clear key to erase any previous work. In the Generalities section we stated that a Blue key names require the Shift key first and Orange key names require the ALPHA key first. That pressing the Shift or ALPHA keys first is understood when a Blue or Orange name is used.
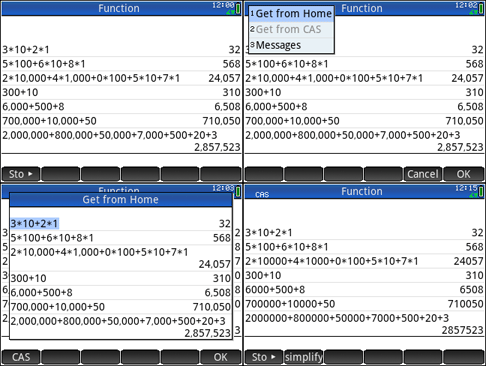
The upper left screen, figure 1, first three lines demonstrate the relationship between expanded form and standard notation. Enter the content on the left of each line into the command line. Press Enter to see its result in standard form. Notice that * designates multiplication and + designates addition. Multiplication has a higher priority than addition. Multiplications are done in order from left to right. Then the additions are done in order left to right. The results are shown with a comma. Please note, that we do not use commas when inputing numbers in the command line. As seen here, the history does not always reflect what was typed in. The next four lines we enter a modified expanded form a line at a time into the command line. Press Enter to see their results in standard form. Again, no commas allowed in input but shown in results.
The upper right screen, figure 1, shows the result of pressing the Menu key. A dialog box pops up. By selecting Get from Home or pressing 1 we bring up the Get from Home dialog box shown in the lower left screen, figure 1. Selecting the first line in the dialog box and pressing the soft key OK or pressing Enter transfers it to the CAS command line. Pressing Enter here shows the CAS result for the original line 1 of the Home screen, lower right screen, figure 1. Note that the CAS results have no commas. The CAS view does not use the Digit Grouping field of Home Settings. The default value of the Digit Grouping field is what inserts the commas into the HOME view. Repeat this process for each line of the original Home screen.
 Figure 1 -Standard Notation - Expanded Form
Properties of Real Number - Addition
We will see next how the HP Prime can help us with learning besides doing calculations.
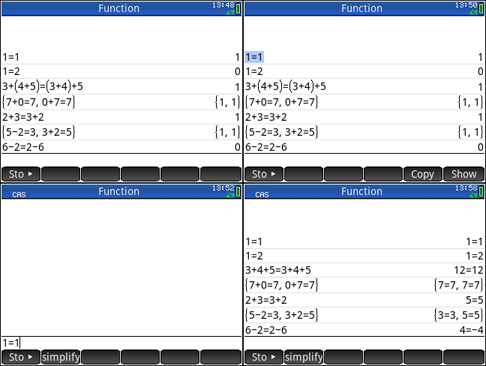
The upper left screen, figure 2, of the collage demonstrates boolean logic and properties of real numbers under addition. Line 1 demonstrates the boolean property that true is represented by 1 and line 2 the boolean property that false is represented by 0, The equal key, =, is used to compare a left expression with a right expression. In line 1 and line 2, the left and right expressions are numbers. Line 3 represents the associative property. Line 4 represents the identity property. Line 4 use the list data type. The list data type lets us put any data type as items in a list. As we can see, we put two equations in the list. List allow us to get multiple result in one line of the screen. To make a list use braces, {}, with items separated by commas. Line 5 represents the commutative property, Line 6 again uses lists to show how a subtraction problem is related to a specific addition problem. Line 7 shows a common misconception. Since the result is 0, false, this example demonstrates that the commutative property does not hold for subtraction of 2 from 6. In math it only takes one example to disprove something.
Press the HOME key to change to HOME view. Use the Clear key to erase any previous work. The upper right screen, figure 2, show line 1's content highlighted. The highlighted content is us selecting it. Press the soft key Copy to transfer a copy of the contents to the command line of the Home screen. Next, press the CAS key. In lower left screen, figure 2, notice that the CAS screen command line now has the content. Next, we see in lower right screen, figure 2, that Pressing Enter placed the content and result in the history. .Repeat the process for all lines of the Home screen. This process is an alternative to pressing the Menu key and using Get from Home that we used in the above first four screen collage.
In the lower right CAS screen, figure 2, we notice the results are quite different than the upper right Home screen results, figure 2. The CAS results instead of being boolean are simplified left and right expression. We see all but line 2 and line 7 are equalities. Since the result is obviously true, the original content must be true as well. Line 1 and line 7 results are false statements, therefore the original content must be false as well. As we see the HOME view and CAS view handle the results quite differently.
 Figure 2 -Associatice, identity, commutative properties for addition
Working with Polynomials
Press the CAS key to change to CAS view. Use the Clear key to erase any previous work. For the CAS Example we use the four screen collage found in the Generalities Views section. We display it again on this page, see figure 4. The upper right, upper left, and lower right screens have us assigning values to CAS variables and performing CAS toolbox's menu > sub menu commands.
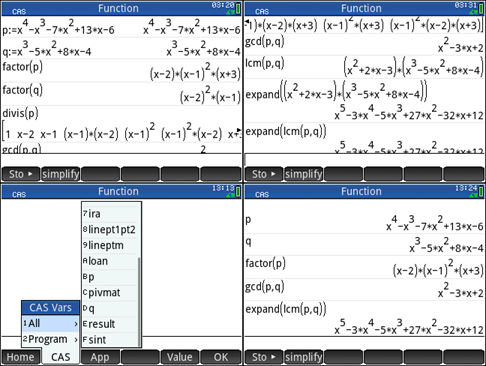
Continuing with figure 4. For the first line type as shown: p := x4 - x3 - 7x2 + 13x - 6 . We do same for second line defining q. Note the color use in the p assignment statement to indicate the use of the Shift and ALPHA keys. Also, note the use of a colon before the equal sign. This is a programming style thing, :=, rather than an algebra style of using only an equal sign. An equal sign by itself will not work. The exponents are done by using the power key, xy. We need to use the right side of the rocker wheel to exit exponent mode. The coefficients, numbers in front, of the variable x, imply multiplication. We could use an * between the coefficient and the x as shown in the history but it is not necessary for input. For the squared terms, x2, we can use its key, but using the power key also works.
Remember in the Generalities Keyboard section we showed a picture of the first row gray keys, figure 3. We stated that the x, t, theta, n key, fourth key in that figure, can be used to enter the independent variable in the command line. When the HP Prime has Function in the title bar this is an easy way for CAS view to enter lowercase x and HOME view to enter uppercase X. Note that whatever HP Prime app that was selected by our last use of the Apps key will be the app’s name that appear in the title bar. The Function app is the one set when we initialized our HP Prime. The technique of using the x, t, theta, n key rather than using ALPHA could be used in line 1 and line 2 to enter the x’s.
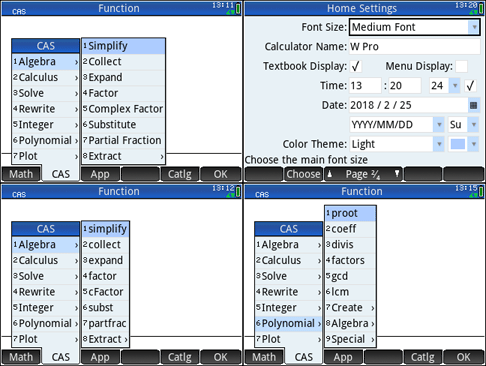
In Settings, General Settings, we wrote that to have the menu and sub menu display the name of the command rather than a descriptive phrase, uncheck the Menu Display box in Page 2/4. In the Settings section, the Home Settings Page 2/4, figure 1, upper right screen showed Menu Display box as checked. In figure 3 below, the upper left screen shows the use of descriptive phrases in the sub menu since the Menu Display box is checked. Figure 3, upper right screen shows the Menu Display box now being unchecked. Figue 3, lower left and right screens show the menu and sub menu using commands. To summarize, if the Menu Display box is checked the menus and sub menus describe the commands and return the command when it is selected and when unchecked uses the command names for display and selection.
It is easer to follow the instructions for creating figure 4 results if you have Menu Display box in Page 2/4 of Home Setting unchecked, see figure 3 upper right screen. Notice, that the commands factor, divis, gcd, lcm used in figure 4 are included in sub menus of the CAS’s Algebra and Polynomial menus, lower left and right screen of figure 3.
 Figure 3 - CAS menus Home Settings Page 2/4
Returning to entry of our content in figure 4’s upper left screen. For line 3 press the toolbox key, figure 3 of the Generalities Keyboard section. The toolbox is the second key of that figure. Select or use the number of command for the CAS soft key’s 1 Algebra menu, 4 factor sub menu command. Inside the factor() parenthesis key in the letter P. Press Enter. View the results for line 3, factor. Since we are in CAS view default for letters is lowercase. Repeat the procedure for line 4, figure 4’s upper left screen, using the letter Q.
For line 5, figure 4’s upper left screen, press the toolbox key Select or use the number of command for the CAS soft key’s 6 Polynomial menu, 3 divis sub menu command. Inside the divis() parenthesis key in the letter P. Press Enter. View the results for line 5, divis. Since we are in CAS view default for letters is lowercase. The result are too long for one line. In Generalities, Touch screen, we commented that if a result is too long to read with one line, sweep the line with your finger or stylus to show the remaining part of the result. This is shown below in figure 4 upper left and right screen.
In addition to swiping we also commented that we can use our finger or stylus to scroll the history area to see past content and result that no longer are shown. This is shown below, figure 4 upper left screen and right screen,
For line 2 of upper right screen, figure 4, press the toolbox key. Select or use the number of command for the CAS soft key’s 6 Polynomial menu, 5 gcd sub menu command. Inside the gcd() parenthesis key in P,Q. Press Enter. View the results for line 2, gcd. Since we are in CAS view default for letters P and Q is lowercase. For line 3, figure’s 4 upper right screen, press the toolbox key. Select or use the number of command for the CAS soft key’s 6 Polynomial menu, 6 lcm sub menu command. Inside the lcm() parenthesis key in P,Q. Press Enter. View the results for line 3, lcm. Since we are in CAS view default for letters P and Q is lowercase. For line 4, figure’s 4 upper right screen, press the toolbox key Select or use the number of command for the CAS soft key’s 1 Algebra menu, 3 expand sub menu command. Inside the expand() parenthesis highlight in the history the previous result and press soft key copy to transfer result to the inside of the parenthesis. Press Enter. View the results for line 4, expand (the highlight of history copy to inside of parenthesis is not illustrated). The nested expand(lcm(p,q) result is cut off. We renter it as the last line of the next screen. We willl discus it there.
Shown in lower right screen, figure 4, is what happens when we pressed the Vars key followed by pressing the soft key CAS. The hiighlighted 1 All menu shows the stored variables and CAS pograms. We will show in the Finite Math tab how immediate programs ira, linept1pt2, lineptm, pivmat, and sint.work with all HP Prime devices including the Free and Lite version of the HP Prime. For now we will select or use the number of the variable 8 p. The result is shown in the lower right screen, figure 4. Do the same for our other stored variable, q, figure’s 4 upper right screen, .
The lower left screen line 1 and line 2 shows the result of selecting p and q from the sub menu in the lower left screen, figure 4. Since variables names are so short we coud of just keyed in letters P and Q. Again, since we are in CAS view default for letters is lowercase. Next we repeat gcd(p,q) command from the previous screen. You can skip this entr. The nested expand(lcm(p,q)) result is shown next. We will discuss three ways to accomplish this. For all three methods, start by pressing the toolbox key. Select or use the number of command for the CAS soft key’s 1 Algebra menu, figure 3, and 3 expand sub menu command, figure 3.
Now, for method 1, Inside the expand() parenthesis key in LCM, press () and key inside this parenthesi P,Q. .Press Enter. View the results for line 5, expand. Since we are in CAS view default for keying in LCM, P, and Q is lowercase lcm, p, and q.
For method 2, Inside the expand() parenthesis, press the toolbox key, select or use the number of command for the CAS soft key’s Polynomial menu, 6 lcm sub menu command Inside the lcn()'s parenthesis key in P,Q. .Press Enter. View the results for line 5, expand. Since we are in CAS view default for letters P and Q is lowercase.
Method 3 assumes we have the results for lcm(p,q) somewhere in the history. For method 3, Inside the expand() parenthesis, we scroll up in the history until we find lcm(p,q). W select it and use soft key to transfer to inside the expand() parenthesis. .Press Enter. View the results for line 5, expand.
Prime Academy | Learning Center
giving every student every chance to learn and understand
© 2018 -2022 Computer Learning Service. All Rights Reserved.
