HP Prime Getting Started - Generalities > Settings > Examples > Arithmetic Fundamentals
Click on the embedded link to go to the Info menu page or click on the direct link to go directly to the youtube site to play a video on getting started with the HP Prime.
Embedded YouTube video file or direct link
HP Prime Getting Started Generalities or direct link
Keyboard | Touch Screen | Views
HP Prime Getting Started - Generalities
Getting started consist of thee topics: Generalities, Settings, and Examples. Read this section on Generalities first. Go to Settings next, and then Examples.
A fourth option, Arithmetic Fundamental, is a new option added for 2022. It relies on a holistic approach. Use the Arithmetic Fundamental link above to read about its approach and relationship to our new printed paperback HP Prime Guide THE SILVER-BURDETT ARITHMETICS (Annotated) Selected Exercises and accompanying Basic Math OneNote notebook.
The content contained in the Generalities, Settings, and Examples pages will help you understand the underlining structure and operation of your HP Prime. Use your initial viewing of the three getting started topics to get an overview of the material. Later when you have questions about the underlining structure and operation of your HP Prime you can return to these pages for guidance.
To navigate the Getting Started topics, you can use the top HP Prime Getting Started links at the top of the page or the drop down HP Prime menu. The Getting Started pages also have links to subtopics listed on the page. Use these links to go quickly to the subtopic area.
Note: When referring to figure or a section of a four screen calculator collage, we will provide a link to the figure or section. If the figure or screen collage is on a different page or not showing in the current view, click on the figure's link or section of the screen collage's link to view it. Press the browser back button to return to the instructions you were reading. It may be necessary to scroll slightly in order to see the browser's back button.
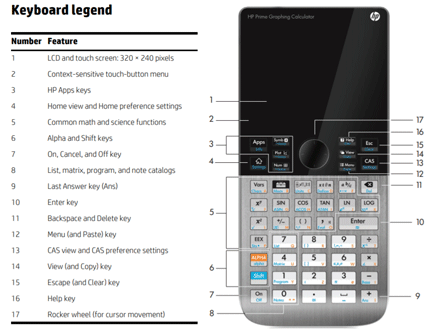
The HP Prime Calculator has three main components: the HOME view, CAS view, and App view. The App view is controlled by the Symb, Plot, and Num keys. In the picture below HOME view is number 4, CAS view is 13, and App view is 3.
 Figure 1 - Keyboard legend (Quick Start Guide 3)
Remark: The HP Prime Calculator is available as a pc / mac software emulator plus lite / free and pro Apple, Android, Windows appstore versions. Directions, unless otherwise noted apply to these devices as well. On phones and tablets we recommend that you use an inexpensive stylus, free stylus on new promotional (advertising style) pens, or the stylus that comes with some tablets and phones.
Primary and Secondary key functions:
· We will use Black, Blue, and Orange key names. Blue names require the Shift key first and Orange names requires the upper case ALPHA key first.
· We will use Black to refer to keys with a Black label, keys with a Black background and white label, or soft keys generated on the screen. For the Black key label and Black background the Black key name will be the key's primary function.
· Black keys are entered directly.
· When using a black and white eBook reader's browser use the key's name to determine if the Shift key or ALPHA key is needed.
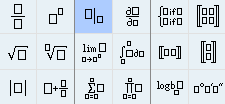
One of the most useful Black keys is the math template key, third key in figure 3. Pressing it gives the dialog window shown next. We like to refer to the highlighted icon as the with operator.
The other key that you want to know is the Help key, number 16 in figure 1. Use it at anytime to get assistance with the current process.
The keyboard is divided into a black and gray area. The dark keys with white labels in the black area, have two functions with the second function being accessed by pressing the Blue Shift key. In the gray area, white and light gray background keys, we find the Blue Shift key and Orange ALPHA key. Except for the Blue Shift key and Orange ALPHA key, keys in the gray area have either a second or third function. The second function comes from pressing the Blue Shift key fist. The third function comes from pressing the Orange ALPHA key fist. The first row of the gray keys is shown next.
We begin by looking at the primary function for the keys of first row, figure 3. The representations shown on the top half of the key is the key's primary function. Our main use of the Vars key will be in conjunction with using the screen's soft key CAS to call up variables or names of our immediate mode Free / Lite programs, figure 5 lower left screen. We will use the Toolbox key in conjunction with the screen's soft keys. The math template key is used to select a math template, see figure 2 for the palette of per-formatted templates. The x, t, theta, n key is used to enter the independent variable in the command line. The default HP Prime app is the Function application. We can following other app use, press the Apps key and reselect the Function app. When the HP App is set to Function, the title bar will be labeled Function. Pressing the x, t, theta, n key and noting the fact that x is the independent variable for the Function app, is an easy way for CAS view to enter lowercase x and HOME view to enter uppercase X. The a b/c key is the fith key. It toggles the form of the answer. It execution varies depending if we are in HOME view or CAS view. The back space key main use is to delete the previous character and a secondary use is to delete entries in the history area.
We now look at the secondary function of the keys of the first row, figure 3. The secondary function is shown in the bottom half of the key. For the secondary keys, the ALPHA key produces letters, uppercase for HOME view and lowercase for CAS view. The Shift key produces the Blue functions shown on the keys. The Chars gives us all the characters available. The Mem gives us the Memory Manager screen. The Memory Manager is used to control variables and Backup the calculator. The Units key comes in handy with physics and chemistry problems. The Define key lets lets us define and work with user variables. The degree minutes second lets us easily add these parameters when working with trigonometry, The Del deletes the next character.
 Firgure 3 - First row gray keys
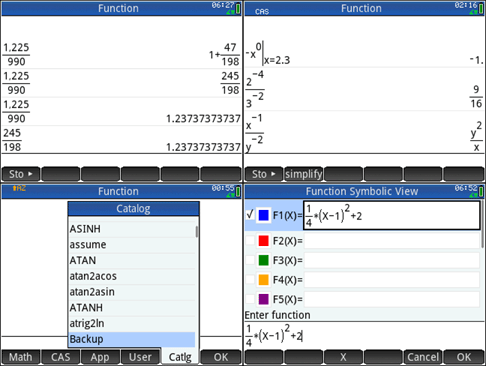
Returning to our discussion of the gray area, for letters labeled A-Z the Orange ALPHA secondary function default behavior depends on whether we are in HOME view, uppercase letters, or CAS view, lowercase letters. Before we discuss in more detail how HOME view and CAS view work let's look at four sample screens shown below.
Upper left, figure 4, is HOME view screen with us using three repeated entries to illustrate various possible outputs when we type 1225/990. The last entry 245/198 is used to show that the reduced entry for 1225/990 produces the same decimal result.
What we did to get the various outputs is press the a b/c key. Notice that the calculator's default settings output of our input 1225/990 shows it now with a comma. Please note, that we do not use commas when inputing numbers in the command line. As seen here, we need to note that the history does not always reflect the form of what was typed in.
The result for 1225/990 will first be shown as a decimal. Pressing a b/c key changes the answer to a reduced improper fraction. Pressing a b/c key again changes it to a mixed numeral. Pressing additional times will toggle results between the three forms (notice our screen shot has the results shown backward from the default order). Notice that the upper left corner of title bar is blank for HOME view. Here is the example from the Algebra tab using a b/c key to find a rational representation for a repeating decimal using the CAS view. CAS view is preferred view for exact answers, see link in next remark.
Remark: Be careful the HOME view method of displaying various representations is not guaranteed to be correct. See Joe Horn’s comment in that link.
Upper right, figure 4, is CAS view screen showing results using symbolic results or exact numbers. Notice the use of long vertical line in first entry. This comes from selecting the with operator, shown above in figure 2, from the math template key. Notice in the history area the use of lower case letters for the shown commands plus the small caps CAS in upper left of the title bar.
To display the upper right, figure 4 results we need to use the template key, rocker wheel, change of sign key (+/-), alpha keys, power key (xy), equal key (=), and divide key. We need to press the CAS key to set the display to CAS view since we are doing exact/symbolic calculations. If necessary press the Clear key to erase any previous results.
For the opposite of x raise to zero power with x=2.3 start by pressing the template key and use the rocker wheel to highlight the with template. Press Enter to add it to the command line. Use the rocker wheel to move the upper entry. Press +/- key, press the x key, the xy key, and then 0. Use rocker wheel to move to with lower entry, press the x key, = key, 2.3, and then press Enter.
For 2 raised to the negative 4 divided by 3 raised to the negative 2 start by pressing 2, then the xy key, +/- key, 4. Next press the divide key, 3, +/- key, 2, and then press Enter. Use same technique for the next entry except use x and y.
Lower left, figure 4, is result of pressing the toolbox key from the HOME view. The soft key Catlg was touched followed by pressing the letter B. Notice the orange UpArrow AZ in the left corner of the title bar. If we were in CAS view we would see CAS and UpArrow az in the left corner of title bar. Pressing the letter B in CAS view will also show Backup. In both cases UpArrow means keyboard is locked in ALPHA mode and that pressing the letter B will in both HOME view and CAS view take us to the first B entry in the catalog. No need to press ALPHA since an ALPHA lock was automatically turned on by us pressing soft key Catlg. Since the lock is on, if we wish to look up other commands press the command first letter. This area where lock and keys is shown allows us a handy area to look at when using the ALPHA and Shift keys since it let us know the current state of the ALPHA and Shift key.
Remark: The Lower left, figure 4, Catalog’s screen is slightly dated. The new version's listing are more complete. There are now listings for Home, CAS, App, and User items. The new Catalog’s screen has a search icon in the Catalog title. Selecting the search icon lets us input multiple letters. Selecting the upper right circle i icon in the Catalog title shows the breakdown of types in the listing. Listing are identified by type as well.
Lower right screen, figure 4, is th HP Prime Function App’s Symbolic View. We press the App key followed by the Symb key. By default the command line uses uppercase. The default HOME Settings has us inputing in Textbook mode.
To enter F1(X)= value, press Clear if necessary to clear all expreesions (press ESC to cancel or Enter to clear all expressions). Use appropriate calculator keys. Press Enter when done. Use rocker wheel to select F1(X)= field, press soft key Edit, make any corrections if there are any mistakes.
 Firgure 4 - (HP Prime Guide Algebra Fundamentals)
Returning to our discussion of how letters are created in HOME view and CAS view. Remember to look at the upper left corner for a visual representation of the current state of Shift and Alpha keys, figure 4 lower left screen.
· HOME view – both uppercase and lowercase letters can be entered. Default entry is uppercase. Pressing ALPHA twice lock us into uppercase. Shift ALPHA i.e. (alpha) switches entry to lowercase. Pressing ALPHA again lock us into lowercase. Pressing ALPHA following key entry switches lock or shift mode back to default entry.
· CAS view – both uppercase and lowercase letters can be entered. Default entry is lowercase. Pressing ALPHA twice lock us into lowercase. Shift ALPHA i.e. (alpha) switches entry to uppercase. Pressing ALPHA again lock us into uppercase. Pressing ALPHA following key entry switches lock or shift mode back to default entry.
· Pay attention to our comments about case throughout this documentation. As in some cases a specific case is required. The entry’s case may not be the default for that view.
Remark: From this point on we will refer to primary and secondary key functions by the key’s Black, Blue, or Orange color. That pressing the Shift or ALPHA keys first is understood when a Blue or Orange name is used.
As we mentioned earlier their are soft keys generated on the screen. These soft keys form a menu bar. Many of our actions with the HP Prime cause soft keys to have menus and sub menu items that extend upward, figure 5 lower left screen. Depending on the HP Prime device, they are accessed by touching with a finger, stylus, or mouse. The menu and sub menu items can also be selected with its number.
Pressing Enter in HOME view or Enter or Approx (wavy lines) in CAS view transfer the results of the command line content to the history area of the screen. Highlighting any content or result shown in the history area and pressing Enter or soft key Copy transfers the content or result to the command line. Pressing twice quickly is another technique that accomplish the transfer.
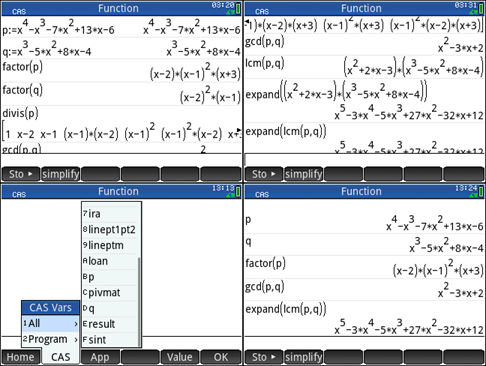
As we mentioned, touching any initial content or result shown in history highlights it. Pressing the back space key deletes it. If a result is too long to read with one line, sweep the line with your finger or stylus to show the remaining part of the result, figure 5 upper left - line 6 and upper right screen - line 1.
Figure 5 calculations are discussed under subheading CAS Example in the next section.
We can use our finger or stylus to scroll the history area to see past content and result that no longer are shown on the screen, figure 5 upper left and right screen. By scrolling upward in figure 5 upper right screen we would see the upper left screen except that the line that was too long would still show the remaining part of the result.
The HOME view is activated by pressing the black HOME key. The HOME view works as a scientific calculator performing numerical calculations with 12 digit precision. HOME view default is approximate calculations (decimals).
The CAS view is activated by pressing the black CAS key. The CAS view performs symbolic calculations. CAS stands for Computer Algebra System. CAS view default is exact computation (math expressions, symbols, and fractions instead of decimals).
We will generally use the CAS view for our HP Prime math tutorials. For your work, we recommend CAS view’s with Entry set to Textbook, since it is less error prone then Algebraic Entry. The default Textbook Display box being checked lets the exact nature of the results be easy to read.
Lower left screen's menu, figure 5, shows variable p and q that we recently added plus the names of immediate mode Free / Lite programs that we will illustrate in the Finite Math tab.
 Figure 5 - (HP Prime - YouTube Videos for Xcas)
As mentioned earlier, the default App is the Function App. Pressing the black Apps key, figure 1, allows us to select another App The title bar, figure 5, list the current selected App. Many of the calculator functions are provided by the calculator's Apps. The calculator's Apps are dedicated to math topics or tasks, specialized Solvers and Explorers. The Symb is the algebraic view, The Plot shows the graph. The Num shows the numeric or table view. The View key lets us control the way the screen is setup.
The HOME view and CAS view workspaces are separate but HP made an effort to provide some connectivity between them. The nature of the two system causes inconsistencies. To avoid confusion, we recommend that you generally use the system created for the CAS view.
Prime Academy | Learning Center
giving every student every chance to learn and understand
© 2018 -2022 Computer Learning Service. All Rights Reserved.
